Tuesday, December 10, 2013

Candied Nuts

This holiday season my gift budget is significantly tighter than it was in year's past. While there are many, many perks to culinary school, a steady income isn't one of them. So in thinking about what to give my favorite people this year, I knew it was going to be a) food-related and b) DIY. My family and friends are scattered around the country, so I knew it needed to be something that would stay fresh for more than just a few days. Cookies and other baked goods are great for those who live nearby, but something that needs to be shipped has to have a longer shelf life.
 
 
So I thought, what's something that people love that's relatively easy to make in large quantities? Candied nuts. Or at least I hope they do! (Except for those with a nut allergy, who will be receiving a nut-free gift.) Every Christmas my aunt makes candied nuts for an appetizer on Christmas day (I devour practically the entire bowl), so I was inspired to do the same. I didn't have her recipe, but I did a little digging and experimenting and found what sounded like a great recipe from Smitten Kitchen, which was originally adapted from Elizabeth Karmel of Hill Country.

 
Needless to say, the nuts turned out wonderfully. The combination of sweet and spice is just right, and no one flavor overpowers the other. And they were so easy to make. Now I'm inspired to test out my own recipes, and I have a few ideas that I'm hoping to share here over the next week or two. I'm keeping my packaging a secret for now, because I want to surprise those I'll be giving these too. But maybe once they're all done, I'll give you a sneak peak. And hopefully you're now inspired to make these, whether for a gift, a cocktail party you're hosting, or a snack to eat while you snuggle up and watch old Christmas movies. I've already devoured my first batch and it hasn't even been a full week.
 
 
Candied Nuts
 
Time: 10 minutes active, 30 minutes inactive
Yield: 1 pound
 
Ingredients:
 
1/3 cup dark brown sugar
2/3 cup white sugar
1 1/2 teaspoons kosher salt
1/4 teaspoon cayenne pepper
1 teaspoon ground cinnamon
1/3 pound walnuts
1/3 pound pecans
1/3 pound almonds
1 egg white, room temperature
1 tablespoon water
 
Preheat oven to 300 degrees.
Mix sugars, salt, cayenne, and cinnamon with a whisk until fully combined.
Beat egg white and water until frothy, about 2 minutes (I used a whisk, but you could also use a hand mixer).
Add nuts, stir until completely and evenly coated.
Add sugar mixture, stir until completely and evenly coated.
Spread on a cookie sheet lined with parchment paper.
Bake for 30-35 minutes, stirring occasionally until golden brown and crunchy (they will become crunchier once they cool).
Spread nuts as they cool, otherwise they will stick together (mine did this and I had to break them apart).
Serve immediately or store in an airtight container such as a mason jar. The more frequently you expose them to air, the more quickly they will become stale.

Wednesday, December 4, 2013

Gluten Free Oatmeal Pumpkin Cookies

Confession: I fully realize it would have been much more beneficial to you if I posted this recipe before Thanksgiving, but life has been a little busy of late. I don't know if I've told you, but there have been some pretty exciting changes in my life over the past few months. In early September I quit my full-time job as a PR manager at a branding agency to... drum roll please... go to culinary school! I'm currently enrolled at the Institute of Culinary Education (ICE) in Manhattan, and am doing a dual program, taking Culinary Management and Culinary Arts classes. Basically I'm learning all about the business side of the food industry, as well as further developing my cooking skills (and trust me, there is a lot more developing to be done). It's been an incredible experience so far, and I have already learned so, so much and met some amazing people. I hope to share my experiences with you here over the next six months (both programs end in April, and then it's time to find this girl a job). 


But enough about me. Let's talk about these cookies. Personally, I love and can't get enough of them. And I think my friends, who I forced to be taste testers, would agree. I've probably made these at least a half dozen times since I perfected the recipe (it took about three tries to get it right).


I often find that gluten-free cookies can be really dry (depending on where you get them and who bakes them), and I hate that. Why should we have to suffer? I wholeheartedly feel that gluten-free baking can be just as good as gluten-full baking as long as you have and use the right combination of ingredients. And it may mean almost overcompensating with moist ingredients sometimes (in this recipe, the pumpkin puree adds a ton of moisture, but in other recipes I sometimes double the amount of eggs or add applesauce). Regardless, I love these oatmeal pumpkin cookies, full of fall flavors like cinnamon, cloves, and nutmeg, and hope you do too. And hey, even though we're past Thanksgiving, who says you can't bring these to your annual holiday cookie exchange, or bake them for your favorite family and friends?


Gluten Free Oatmeal Pumpkin Cookies

Time: 40 minutes total, 25 minutes active
Servings: 2 dozen cookies

1/2 cup butter, slightly softened but still cold
1/2 cup granulated sugar
1/2 cup brown sugar
3/4 cup pumpkin puree
2 teaspoons vanilla extract

1/2 cup brown rice flour
1/2 cup tapioca flour
1/4 cup sweet rice flour
1/2 teaspoon baking powder
1/2 teaspoon baking soda
1/2 teaspoon xantham gum 
1/4 teaspoon salt
1 teaspoon cinnamon
1 teaspoon nutmeg
1 teaspoon cloves

Preheat oven to 350º.
Combine flour mixture in medium mixing bowl and set aside.
In large mixing bowl, combine butter and sugar and with hand or stand mixer, blend until smooth.
Slowly add pumpkin puree, then vanilla extract.
Slowly add flour mixture into sugar mixture and blend until fully combined.
Using a small spoon or ice cream scoop, scoop out clementine-sized balls of dough.
Place on baking sheet lined with parchment paper (makes cleanup much easier), and line three to a row. Cookies will not expand much.
Bake for 15 minutes or until light golden and slightly crispy on top. If unsure, stick a toothpick through the center of a cookie to test doneness. If it comes out clean, the cookies are done.

Friday, November 1, 2013

Chicken Tortilla-less Soup

I love making soup in the fall and winter. It's so easy to just throw some ingredients in a pot and let them simmer for a few hours while you catch up on TV shows or read a book. 


A friend recently told me about The Pioneer Woman's recipe for Chicken Tortilla Soup, and had been raving about it. I decided to give it a go, but make it a little healthier by adding more veggies and leaving out the tortillas. In my opinion, the tortillas are neither here nor there, and because there's so much flavor in the soup you don't even miss them.


Soup is the type of thing that tastes better the longer you let it simmer, because it allows the flavors to develop further. So feel free to simmer it longer than I recommend below. Oh, and it's also twice as good the next day. I was really pleased with how this turned out and hope you will be too. And don't be intimidated by all of the ingredients, it's super easy to make.


Chicken Tortilla-less Soup

Cooking time: 2 hours (30 minutes active)
Servings: 8

Ingredients:

5 thin boneless, skinless chicken breasts
16 ounces chicken broth
1 teaspoon cumin
1/2 teaspoon chili powder

1 red pepper, diced
1 green pepper, diced
1 orange pepper, diced
1/2 yellow onion, diced
2 cloves garlic, diced
1 1/2 teaspoons cumin
1 teaspoon chili powder
1/2 teaspoon salt
1 can diced tomatoes (14.5 ounces)
1 can diced green chilies (7 ounces)
1 can black beans (14.5 ounces)
1 cup corn
4 cups chicken stock
4 cups warm water
3 tablespoons corn starch
1 cup warm water

For the chicken:

Ahead of time (preferably the day or morning before you're planning to make it), combine chicken, chicken broth, cumin, and chili powder in a slow cooker or crock pot, and cook on low for 3.5 hours (or until it shreds easily and looks fully cooked). You may have to remove a thin layer of fat from the chicken using a fork (or whatever utensil works best for you). Move to a medium-sized bowl or storage container, shred using a fork, and place in the refrigerator (unless you're planning to use it within 30 minutes).

For the soup:

In a large pot, heat 1 tablespoon olive oil over high heat. Add onion, peppers, and garlic, and sauté for 2-3 minutes. Add shredded chicken, cumin, chili powder, and salt. Continue to sauté for another 2-3 minutes. Add tomatoes, green chilies, black beans, corn, chicken stock, and 4 cups warm water. Bring to a boil.

Simmer uncovered for 45 minutes. 

With a whisk, mix corn starch and 1 cup warm water for 30 seconds. Pour into soup and simmer for 45-60 more minutes. The longer you simmer it, the more the flavors will develop.

Monday, October 7, 2013

Strawberry, Banana, Almond Milk & Cinnamon Smoothie

Two weeks ago I posted a recipe for homemade almond milk, and told you how much it's changed my life. I continue to make it at least once or twice a week, and have loved incorporating it into my morning (and sometimes afternoon) smoothies.


In the morning I tend to go for a green smoothie. I like starting my day off healthy, with a hefty serving of spinach and/or kale. But every now and then I crave something sweeter, and I've come to love this simple combination of banana, strawberry, almond milk and perhaps my favorite ingredient in this smoothie: cinnamon.


I've been leaving the almond pulp in my almond milk for some added protein, and tend to throw in a little flaxseed into this as well. It doesn't affect the flavor because there's already a slight, but not overwhelming nuttiness from the almond pulp. 


Some people complain that smoothies aren't filling enough, and I tend to agree unless there's some form of protein and/or fiber. In this case, the almond milk and flaxseed fill me up, as does the half of a banana. If you're a skeptic, give it a whirl in your blender and let me know what you think. This also makes for a great afternoon snack or even dessert. 


Strawberry, Banana, Almond Milk & Cinnamon Smoothie

Time: 5 minutes
Servings: 1

1 cup homemade almond milk
1/2 frozen banana
1/4 cup frozen strawberries
1/2 teaspoon ground cinnamon
1 teaspoon flaxseed (sometimes I even add 1 tablespoon)
1 date, pitted

Blend almond milk and banana until smooth, then add strawberries, cinnamon, flaxseed and date and continue to blend until smooth. Serve immediately and enjoy!

Tuesday, October 1, 2013

Blueberry Jam

There isn't much of a story here, other than I found myself with at least four quarts worth of organic blueberries from the farmers market and I didn't know what to do with them. Besides opt for the freezer, which was a perfectly good idea.


But then I thought, what if I tried making blueberry jam? I'd never done it before and didn't know how hard (or easy) it was, but in the end it was much, much easier than I expected. 


While I didn't go through the official canning process with my blueberry jam, I'm pretty sure I achieved the same end result. It took all of 15 minutes and now that I've done it, I can guarantee you I will never again buy blueberry jam from the store. This homemade version is much more to my liking and more importantly, has no additives. 


In fact, it only has three ingredients: water, blueberries, and sugar. Four if you count the cinnamon stick.


I've been eating this by the spoonful, drizzled on top of a cracker with cheese, smeared on toast, and even poured hot over coconut ice cream (which, by the way, was the hit of my dinner party with a few girlfriends last weekend). Like most recipes I post here, it's super simple and super quick. 


Time: 15 minutes
Servings: 1 small jar (1 cup)

Ingredients:

1 cup organic blueberries
1/4 cup water
1/2 cup sugar
1 cinnamon stick

Place blueberries and water in a sauce pan over medium heat, until skin starts to break and juices seep out. Add sugar (you can start with 1/4 cup and then add more to taste, depending on how sweet you want it), cinnamon stick, and bring to a light boil. Turn down heat to low and simmer for an another five to ten minutes. Serve immediately over ice cream, or let cool and transfer to a jar and store in a refrigerator. When storing, leave cinnamon stick in so the flavor continues to develop.

Thursday, September 26, 2013

Homemade Almond Milk

Over the past few years, almond milk has become a major staple of my diet. These days I go through at least a quart of it per week, if not more.


I was never a huge milk drinker. I can remember the constant battle with my parents growing up: "Drink your milk!" I do understand that calcium and vitamin D are both key to a healthy diet and more importantly, healthy bones, but both are attainable thorough other foods and/or supplements. Hello, leafy greens!


I've always loved almonds. Raw almonds, almond cake, almond cookies, almond extract in banana milkshakes (a childhood favorite), and so on, and son on.


So it's no surprise that when I tried almond milk for the first time, I immediately loved it. These days I use it in everything—smoothies, oatmeal, cookies, cakes, frosting—you name it. Somewhat surprisingly, it's also a great dessert substitute for those times when you're craving a little something sweet but don't want to over-indulge. It's perfect with a little cinnamon and vanilla.


As I experiment more in the kitchen, I've become really conscious of trying to avoid processed foods if and when possible. If it's easy enough, why not just make it myself? Which is exactly what I decided as I realized I was spending close to $3 a week on store-bought almond milk. Granted, $3 isn't $30, but it adds up over time, and making it would be more cost-effective. My grocery store sells a bag of almonds for close to $7 or $8, so I knew that wasn't doable. But Trader Joe's, on the other hand... They sell a 1-pound bag for $4.99. I'm sure if you buy raw almonds in bulk online it's even cheaper, but for now I'm content with Traders Joe's.


Oh, and have I mentioned how easy it is to make almond milk? And how much better and more natural it tastes than the store-bought, processed stuff? It's amazing, and I can't believe I didn't start doing this sooner. I made it for the first time on Wednesday morning, and I already consumed almost an entire batch and made a second one. I also love that you can play around with the flavor, depending on what you're using it for. Sure, there's always the standard, plain almond milk, or you can make it a little sweeter and more flavorful with dates, vanilla extract and a cinnamon stick or two. I'm also curious to try blending in a little fruit, like blueberries or strawberries. So, have I convinced you? I promise this is one of those things that is 100 percent worth the little bit of extra effort it takes.


Homemade Almond Milk

Time: 5 minutes active, 12 hours inactive
Servings: 1 quart

Ingredients:

1 cup raw almonds
4 cups filtered water for soaking
4 cups filter water for blending
1/4 teaspoon salt, divided in two
1 date

Optional:

1 teaspoon vanilla extract
1 cinnamon stick

Soak almonds, 4 cups water, and 1/8 teaspoon salt for 12 hours or overnight.

Drain, discard water, and rinse almonds thoroughly. Place in blender, add 4 cups water, and blend. Add date for sweetness (taste it, you can always add another one). For additional flavor add vanilla extract and soak cinnamon stick in milk once you transfer it to a container for storing in your refrigerator.

If you want to keep the almond pulp (I generally do), it's good to go as is. But if you want a smoother texture that's lower in calories, strain the milk through cheesecloth into a separate bowl/container, squeeze to remove all the liquid, and discard pulp.

This should keep in your refrigerator for up to five days.

Tuesday, September 24, 2013

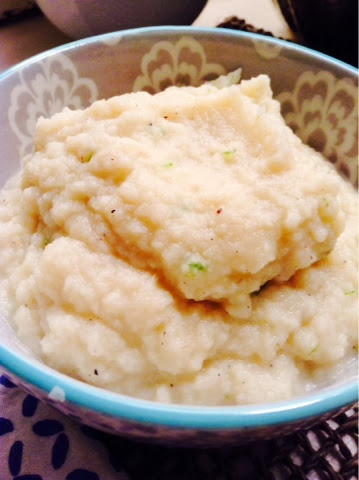
Roasted Garlic Cauliflower Mash

Cauliflower mash came into my life in high school, when my stepmom made it as part of the South Beach Diet. And then it left my life, quickly, not to appear again until this past weekend. Perhaps I didn't have the same appreciation for food that I have now (well, not perhaps, that's a fact). I definitely didn't have the same palate, and now I gravitate towards healthier foods. Whatever the reason at the time, I hated it, and it's been a long-running joke in our family ever since.


But then, this past weekend my parents were visiting New York, and we had quite a memorable meal at The East Pole, a new restaurant on the Upper East Side from the guys behind The Fat Radish. The best part of the meal? Shockingly enough, the cauliflower mash.


It was creamy, garlicy, and buttery. Perfectly seasoned, and the kind of dish that melts in your mouth. 


Needless to say, it drastically changed my opinion of cauliflower mash, and I knew I had to make it in my own kitchen. Where did I turn? To the new cookbook by Danielle Walker, the acclaimed blogger behind Against All Grain (a gluten-free, dairy-free, and grain-free blog).


As always, I tweaked the recipe slightly, and it did not disappoint. While it wasn't quite as buttery as what I had at The East Pole, it was no doubt healthier and certainly still full of flavor. It's a perfect alternative to mashed potatoes or polenta, and was a great addition to my Meatless Monday dinner last night.  


Roasted Garlic Cauliflower Mash

Time: 20 minutes
Servings: 4

Ingredients:

3 cloves garlic
1 teaspoon olive oil
1 head cauliflower, trimmed into florets
1/4 cup almond milk, warmed
1/2 tablespoon butter, melted
1 1/2 teaspoons fresh scallion, diced
1 teaspoon sea salt
1/4 teaspoon black pepper

Preheat oven to broil. Peel garlic cloves and place in a small dish and drizzle with olive oil. Place on lower oven rack and roast for 8 to 10 minutes or until golden brown and soft. 

Meanwhile, bring a medium to large pot of water to a boil and add cauliflower. Cook for 12 minutes or until tender. Drain water and place cauliflower in a food processor. 

Add garlic, almond milk, butter, scallion, salt, and pepper to food processor. Process until smooth (consistency should be the same as mashed potatoes).